


My good friend, Becky, had an over-abundance of zucchini in her garden and was kind enough to share one with me. I usually use the smaller ones in pasta sauce and such; but as soon as I saw the size of this beaut, I knew he was destined for doughy greatness. Zucchini bread is a VERY-favorite of my children. I haven't made it in quite a while; and given the cooler weather this weekend, it was a perfect time for baking. This is my go-to recipe for zucchini bread. Mimi (my grandma--my dad's mom) made this often when I was young...and I started baking it when I was 12. There's no sense trying to improve on perfection...and that's exactly what this recipe is.

Mimi's Zucchi-Nucchi Bread (pronounced zoo-key-noo-key...and yes, it must be said this way)
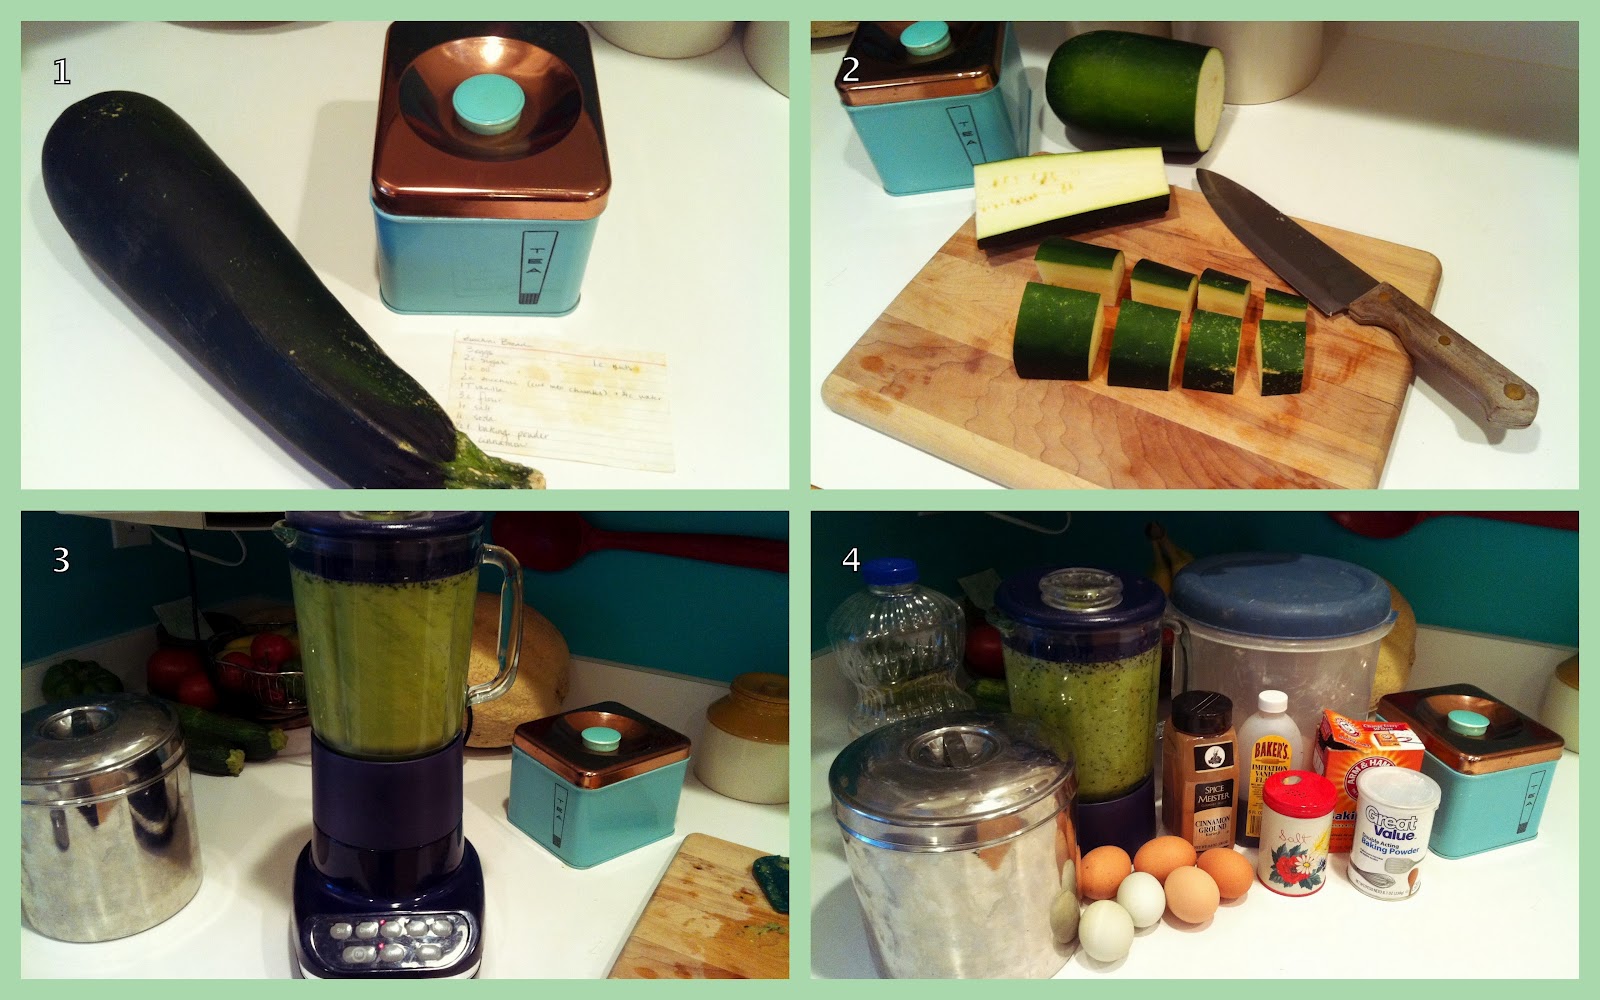
~3 eggs (incidentally, we also get these from Becky...we buy her farm-fresh eggs...at least until our own girls start laying this fall)
~2 cups white sugar
~1 cup vegetable oil
~2 cups processed zucchini (more about that later)
~1 Tbsp. vanilla
~3 cups flour
~1 tsp. salt
~1 tsp. baking soda
~1/2 tsp. baking powder
~1 Tbsp. cinnamon
~1 cup chopped pecans (optional)
(Please note that I *always* double this recipe...I have four children that devour anything that remotely resembles food. So, while the recipe above is for a single batch, all of the following pictures represent a double batch. Same procedures apply, though...I'm sure you'll find it easy enough to follow along. Again, photos are numbered to correspond with the steps.)
Oh!...and your oven will be at 350* for this recipe, but don't preheat it yet. No sense wasting all that energy, heating up your kitchen. This bread takes just a bit of time, so I'll tell you to heat it up later. Don't worry...I'll remember.)
Ok...moving right along...
2. Cut your zucchini up into nice-sized chunks. No need to work yourself to a frazzle...1-2 inch chunks work nicely here.
3. I process my zucchini in my blender--my KitchenAid blender that I've had since we got married...over twelve years ago. This is one of the few small appliances that I own that were it to blow up tomorrow, I'd happily plunk down the money to replace it immediately. It was an expensive blender...and worth every last penny we spent on it. Any-whoo...I process the zucchini in the blender, with no added water. It takes a bit to get it going...I start out with 6-8 chunks, wrangle around with those for a bit, adding a chunk here and a chunk there. Before long, it'll all be chopping along swimmingly and by the end, you'll have a gorgeous puree. I have grated my zucchini before, too, but for some reason the end-result bread wasn't even nearly as nice. It was like the grated zucchini was too wet ?!? (no, I didn't under-bake the bread.) I don't know...all I know is this is what works for me, so this is what I do now...every time.
4. After I've cleaned up from the zucchini-blending process, I get out my ingredients. (six eggs=double batch...remember?)

6. Add your sugar and beat again.
7. Add oil and beat again.
8. Add zucchini and vanilla...and beat again.
9. This is approximately what your concoction will look like now.

11. Again...this is approximately what your concoction will look like after all that is mixed in. If you want to add nuts, this is when you would do so. I almost always add chopped pecans (I always use pecans instead of walnuts...I just like their flavor better), but I was all out tonight and didn't want to wait until tomorrow to bake the bread.

As I was saying...Tip: I always use a paper towel to grease my pans. I hate getting shortening all over my hands...and in my nails...bleck!
13. Hopefully you have some pretty vintage pans to use...your bread will taste so much better...I think?
14. I usually do a combination of loaves and muffins. Another tip: use a standard-size ice cream scooper to fill your muffin cups. It fills them perfectly!
15. Keep in mind I made a double batch...it filled two large loaf pans and twenty-one muffin cups.


You do notice that I'm at my counter, right?
...and I'm standing.
(...and if my closing comments make no sense to you, see the end of my Salted Caramel Crack post☺)
makes my mouth water!! we get 1/2 price fruits and veggies on Tuesdays here in the DR...I may have to add a zucchini to my list for shopping tomorrow!
ReplyDeleteoh and your salted caramel crack was a huge HIT at a party we had the other night :)
ReplyDelete